
Hey Girls! 🙂
Do you sometimes get hybrid manicure applied to your nails?
If you do, then you probably know yourself that this procedure can cost an arm and a leg – especially, when we realize that it lasts for more or less 3 weeks and then you have to make another appointment with a nail technician.
It can’t be denied, hybrid nails are really convenient mostly because this kind of manicure is truly durable. Depending on the pace at which your nails grow, the effect may remain unchanged even up to 4 weeks. After this period, unfortunately, fingernails don’t look as appealing as they used to because the natural nail growing at the cuticle becomes too clear to see. Nevertheless, hybrid manicure is a great solution for all the always-in-rush women who don’t have time to do their nails a few times a week. Moreover, hybrid manicure doesn’t chip off and, thanks to this, our nails remain flawless for really long. And this is considered as a huge advantage especially for those who need to expose their hands at work and are in a face-to-face contact with clients.
The only drawback is that you have to make appointments with a nail technician and stick to the schedule, find time to commute to the beauty parlour and spend over an hour there… unless… unless you give a go to – alike me – applying hybrid manicure at home.
I must admit right at the beginning that in terms of styling and coating nails I’m a complete nonentity. Sadly. Therefore I always preferred having it done rather than doing it myself. I used to do that until one day came; when I got sick and soon after that my nail technician also came round with an illness. Trying to make an appointment at short notice resulted in… hm… that only beauty salons which charge a lot for the procedure had some open slots. To my surprise, it turned out that the cost of hybrid manicure done in such a beauty parlour almost equals the amount I needed to spend on home hybrid manicure kit. Yep 😉
And in this way I became an owner of my own UV lamp, hybrid polishes (base coat and top coat) of a few colours, acetone, cleaner, polishing block, files, wooden sticks, primer, mermaid dust, special pads and many, many other little marvels.
I’ve found the entire complete starter kit that already featured a few shades of nails (I could collect them myself) and I was lucky enough to come across a huge bargain, but I think that if you go for just one nail polish and the accessories, this won’t ruin your pocket. If you take your liking in applying hybrid manicure, you can add more colour nail polishes with time.
Ok, it’s time to proceed with the action.
How to apply hybrid manicure at home?
Hybrid manicure done at home, the one I done the first time, surprised me positively. It appeared that applying hybrid manicure is child’s play. Really, I was truly surprised 🙂 Of course, I didn’t experiment with mermaid dust or any ‘fancy’ stuff like that – just applied a colour. Again, the outcome went beyond all my expectations. It turned out that it is as easy to apply hybrid manicure as it is with… hm… I don’t know… making tea? 🙂
Hybrid manicure step-by-step manual
- Use a wooden stick to delicately yet precisely push back the cuticles – the process of getting rid of cuticles is probably well-known to everybody and I’m sure I don’t have to explain you how to do this. Let me just warn you to be careful enough not to hurt yourself or irritate skin.
- The second step to take while applying hybrid manicure is also fairly ‘usual’ – it depends on giving the nails the shape you want them to have. It’s up to you what shape of nails you want to wear: square, almond-shaped or whatever you wish to have.
- Now, it’s time to make your finger nail plate matte: reach for polishing block and remember to do this very gently 🙂
- Wipe off the finger nail plates with a special cleaner – simply damp a cotton pad with the liquid and start wiping off 😉
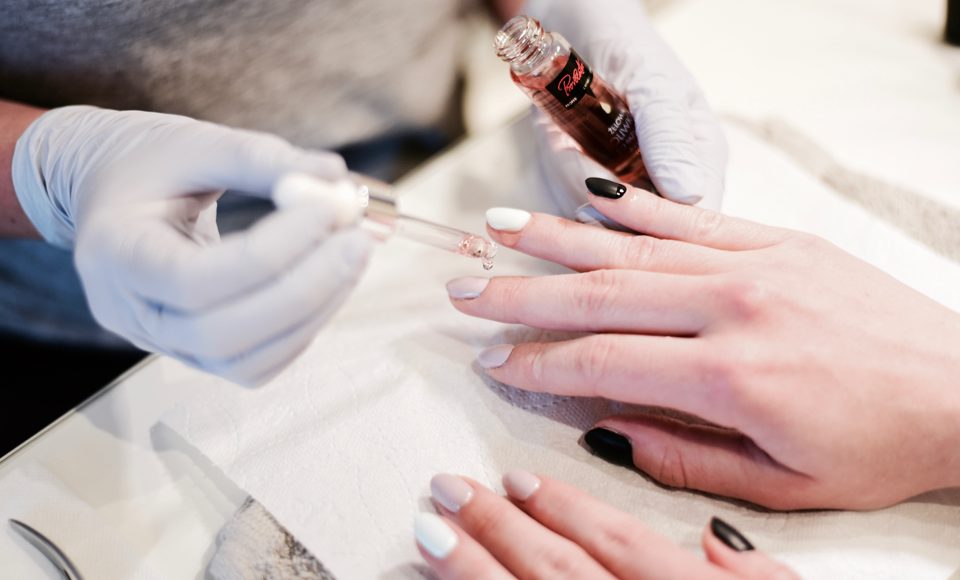
- Hybrid manicure requires applying a special base. The good news is that this item included in every hybrid manicure kit. Just apply a thin layer of a chosen base and make it hard under a UV lamp. Don’t wipe it off with a cleaner.
Caution!
The time required to make the preparations hard depends on the power your UV lamp generates. Producers always give such information in the leaflet or manual that goes with the device. Remember to check this before you start applying hybrid manicure at home. - Time for color! I love this step because, after all, this is why we apply hybrid manicure in the first place 🙂 So, just apply a chosen color/s of a nail polish. My first hybrid manicure was colourful because each of my nails was painted with different colour, yet they toned in with each other. Harden the coloured nails by placing them under UV lamp (accordingly to the power your lamp produces of course).
- It’s time for the second layer of a nail polish, so follow 6th point one more time 🙂
- Now, it’s time to fix your hybrid manicure. Just apply a top coat. I need to tell you that despite protective function, top coats gifts nails with shine and help the colour stay true for long.
And that’s all. Now you can enjoy having your first hybrid manicure. I hope my step by step manual will help you a lot 🙂
However, if you want to remove hybrid manicure, all you need to do is just file it down (personally, I consider this method being the best because it is the least invasive one); the fingernails must be matte and the entire colour must be delicately filed down. In other words, you start the procedure form the third point 🙂
Tell me, are you going to give a go to applying hybrid manicure at home? I’m dying to learn your experience. Leave me comments 🙂


Leave a Reply